How to scaffold Mule flows from a published API spec in Anypoint Studio
In this post, I am going to show you how to scaffold your flows in Anypoint Studio from a published API specification.
Scaffolding Mule Flows from a Published API Spec (Anypoint Studio)· Part 1 of 2
- 1.How to scaffold Mule flows from a published API spec in Anypoint Studio
- 2.How to RE-scaffold Mule flows from an Exchange API specification in Anypoint Studio

In this post, I am going to show you how to scaffold your flows in Anypoint Studio from a published API specification.
Docs
To do this same thing in Anypoint Code Builder, refer to How to scaffold Mule flows from a published API spec in Anypoint Code Builder (ACB)
Why would you want to scaffold Mule flows from an API specification? This way you will be able to get started on your Mule application with a base project that is created upon your specification, instead of starting the Mule project and Mule flows from scratch.
Once you scaffold the Mule project, you will have:
- Mule flows for each HTTP method in your specification
- Basic error handling for different HTTP status codes
- Initial Mule project with some Transform Message components where applicable
Prerequisites
- Anypoint Platform - You should have an Anypoint Platform account. You can create a new free trial account here.
- API specification - You should already have an API specification published in Anypoint Exchange.
- Anypoint Studio - MuleSoft’s IDE based on Eclipse. You can download it here.
- GitHub Repo - If you want to follow along with the code I generated, you can check it out here.
Docs
If this is your first time creating an API specification, refer to How to use MuleSoft’s visual API Designer to create a To-Do API specification using clicks, not code
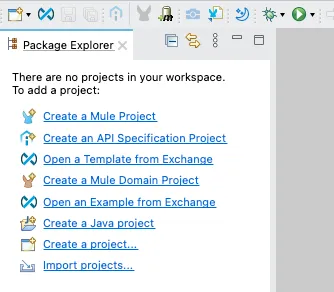
Create a Mule project in Studio
First of all, let’s open Anypoint Studio and click on Create a Mule project from the options on the left.
Add any name of your choice in Project Name. Click on the green ➕ button under Import a published API and select from Exchange.
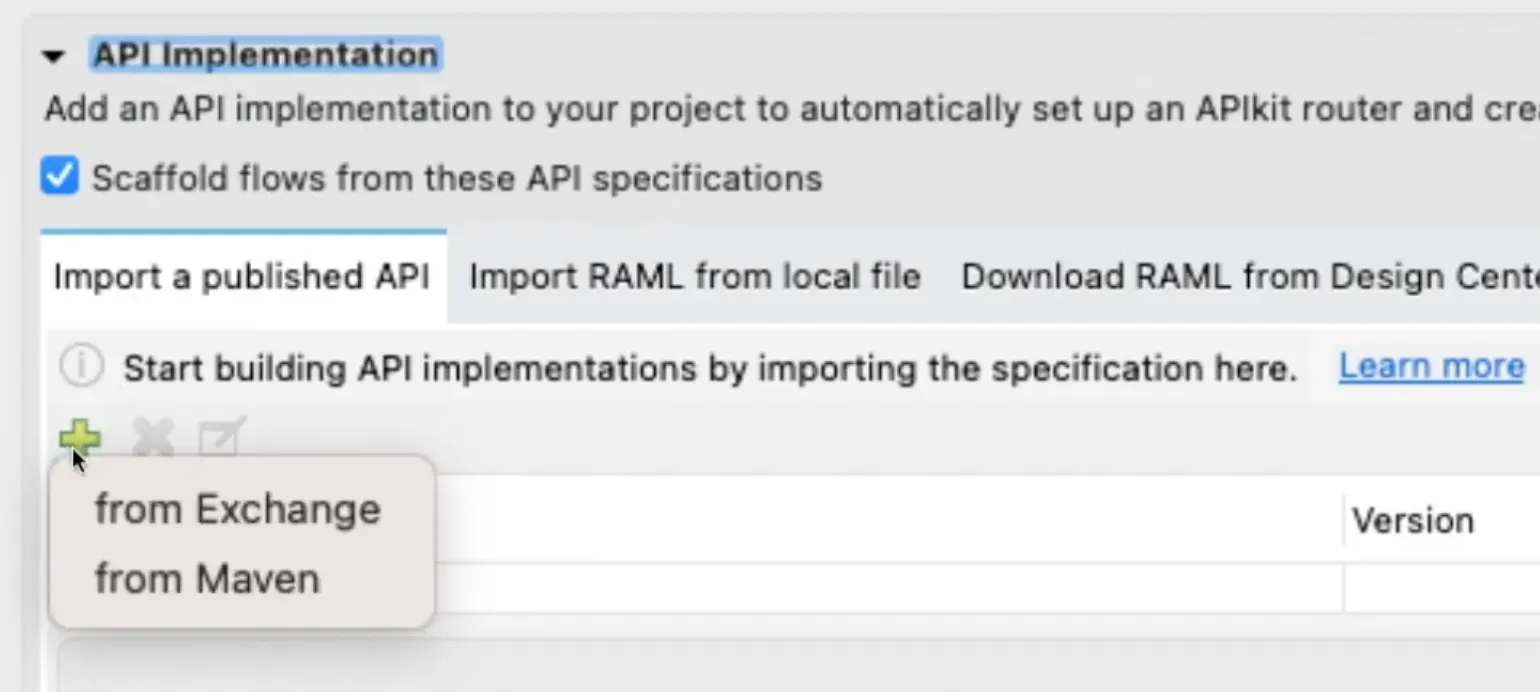
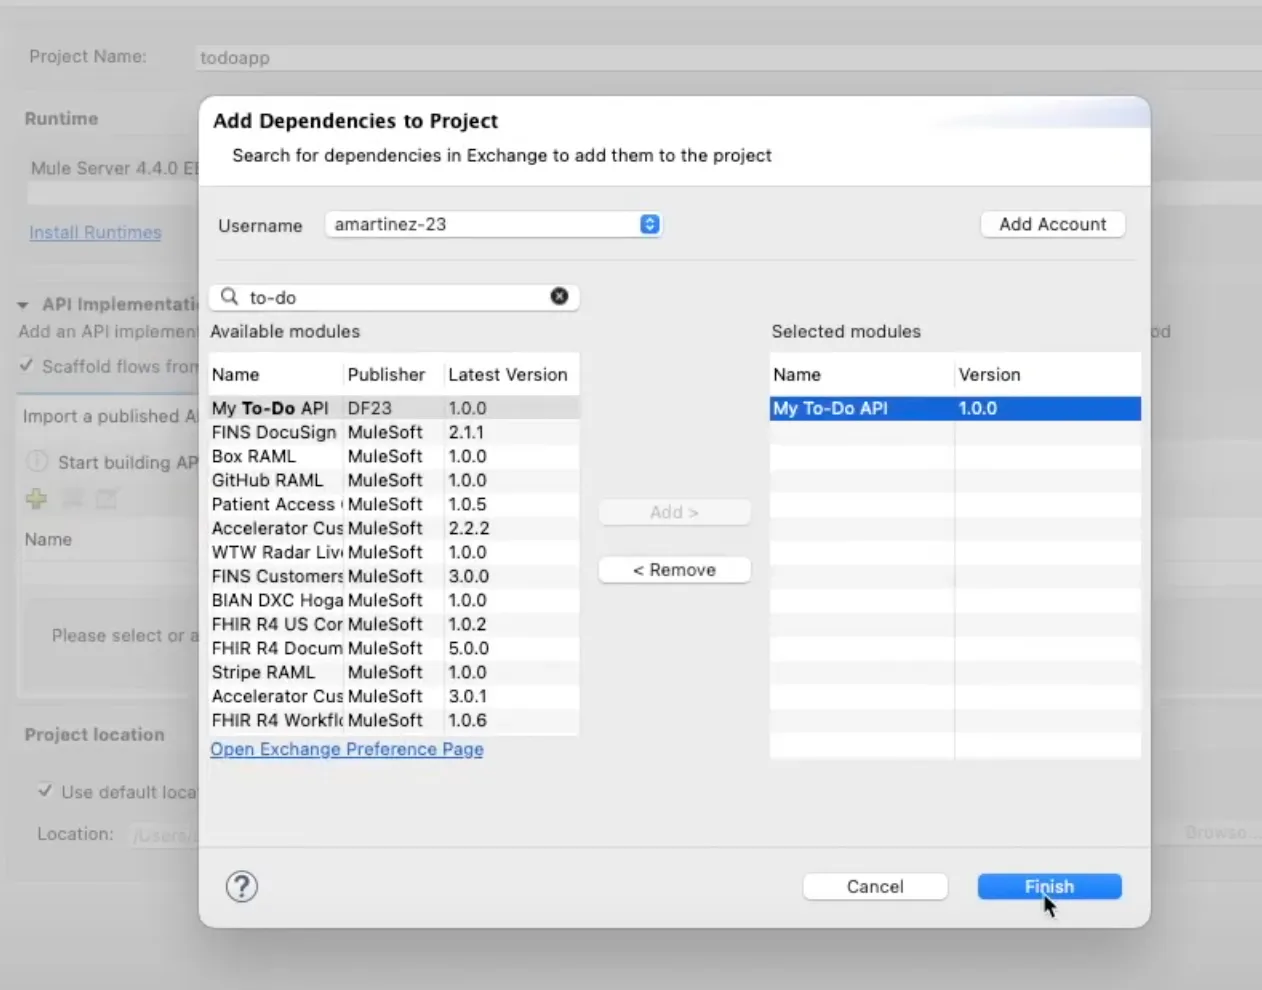
Follow the prompts to authenticate to your Anypoint Platform account by clicking Add Account and adding your Username and Password. Once you are signed in, search for your API Specification, select it, and click on Add >. Once you selected it on the right-hand panel, click on Finish.
After the API appears under Import a published API, you can click on Finish to close the window and see the generated project.
Navigate the generated project
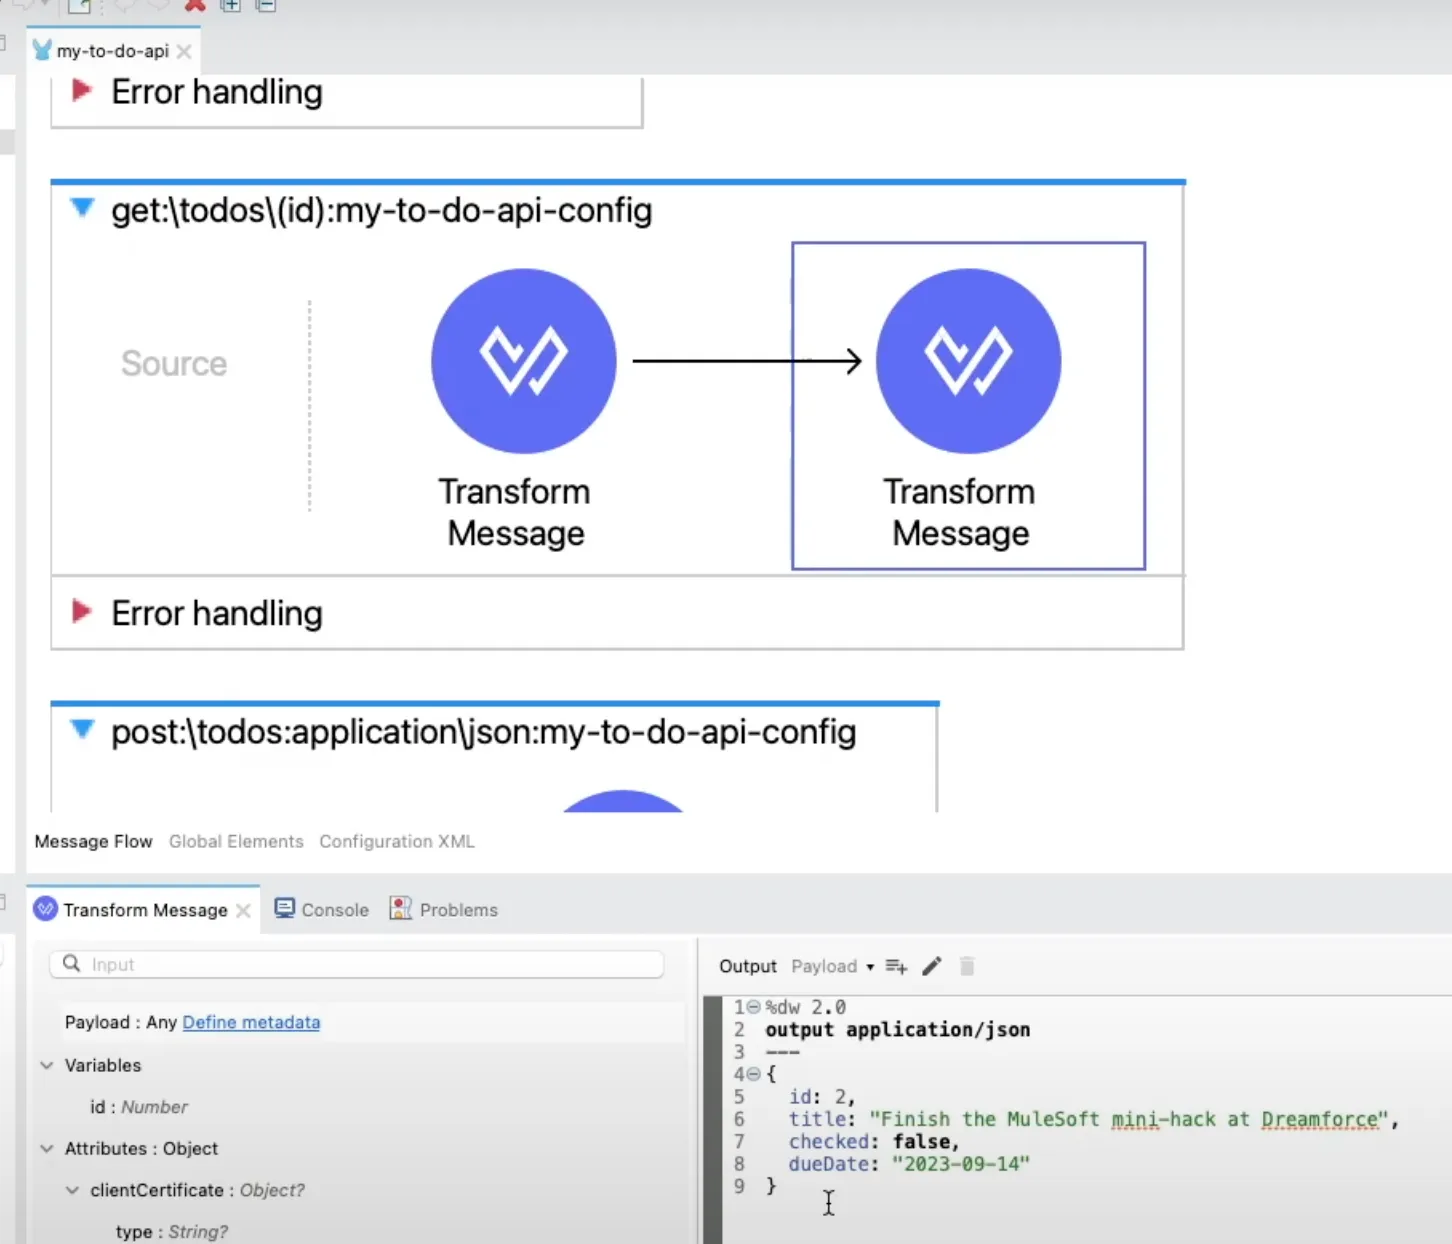
Once the project has been created, you should be able to see the flows in the configuration file located under src/main/mule.
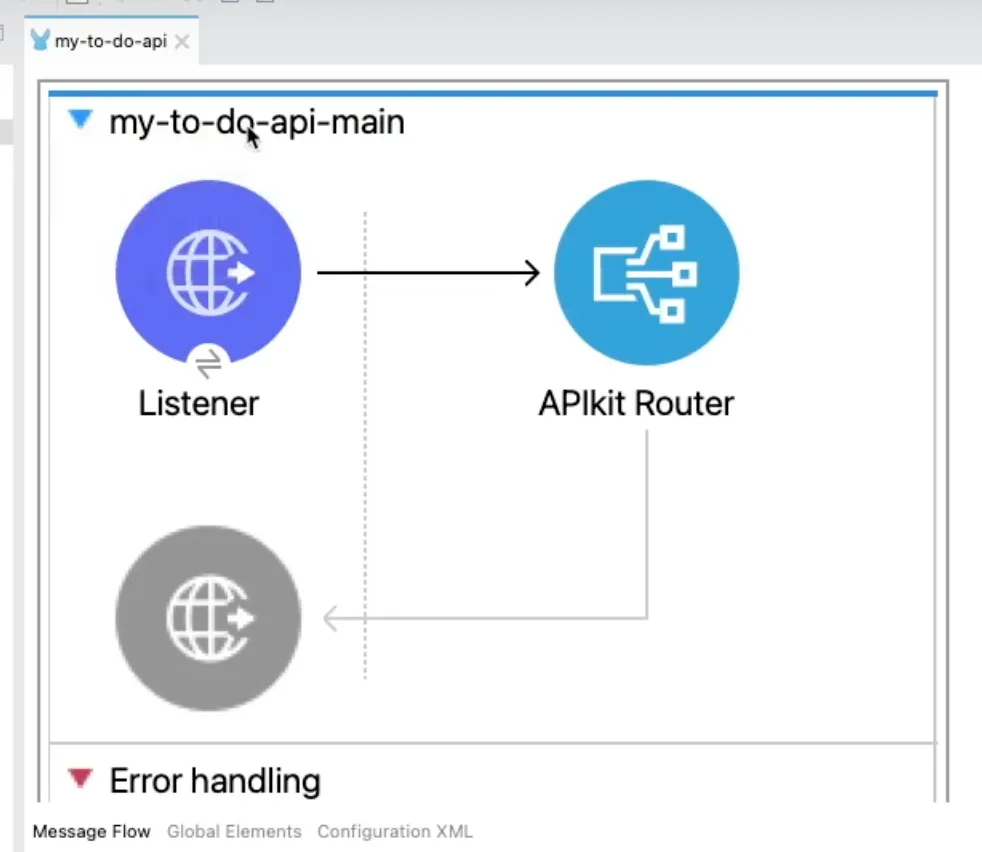
The Error Handling has been added automatically to the main flow as well. This contains the HTTP status codes for some basic errors like 400 Bad Request or 404 Not Found.

Notice how some of the flows already have a Transform Message component for you to see which DataWeave code is needed to retrieve some data like the URI Parameter(s). This, of course, is just in the case that your API Specification contains a URI Parameter.

There will also be Transform Message components added for some cases where you have set up an example in the API Specification.
Pretty cool, right?
Keep posted for some more articles on scaffolding in Anypoint Studio or Anypoint Code Builder!
Remember to subscribe at the bottom of the page to receive email notifications as soon as new content is published.
Prost!
FAQs
Frequently asked questions about this post.
-
Why would I scaffold Mule flows from an API specification instead of starting from scratch?
Scaffolding lets you get started on your Mule application with a base project that is created upon your specification, instead of starting the Mule project and Mule flows from scratch. Once you scaffold the project you get Mule flows for each HTTP method in your specification, basic error handling for different HTTP status codes, and an initial Mule project with some Transform Message components where applicable.
-
What do I need before I can scaffold flows from a published API spec in Anypoint Studio?
You need an Anypoint Platform account (a free trial works), an API specification already published in Anypoint Exchange, and Anypoint Studio, which is MuleSoft's Eclipse-based IDE. If this is your first time creating an API specification, the post links to a separate guide on using the visual API Designer to create one.
-
How do I import the published API into a new Mule project?
First open Anypoint Studio and click
Create a Mule project, then give it a name. Next click the green plus button underImport a published APIand selectfrom Exchange. Follow the prompts to authenticate by clickingAdd Accountand entering your Username and Password, then search for your API Specification, select it, clickAdd >, and finally clickFinishto generate the project. -
What error handling gets generated automatically in the scaffolded project?
Error Handling is added automatically to the main flow, containing the HTTP status codes for some basic errors like 400 Bad Request or 404 Not Found, implemented with On Error Propagate scopes for cases such as BAD_REQUEST and NOT_FOUND.
-
Why do some of the generated flows already include a Transform Message component?
Some flows already have a Transform Message component so you can see which DataWeave code is needed to retrieve data like the URI Parameter(s), which only happens if your API Specification contains a URI Parameter. Transform Message components are also added for cases where you have set up an example in the API Specification.
More from this series
Scaffolding Mule Flows from a Published API Spec (Anypoint Studio)· Part 1 of 2
- 1.How to scaffold Mule flows from a published API spec in Anypoint Studio
- 2.How to RE-scaffold Mule flows from an Exchange API specification in Anypoint Studio