Part 4: CI/CD pipeline with MuleSoft and GitHub Actions - MUnit minimum coverage percentage
In this post, we'll see the steps to add the minimum coverage percentage for the MUnit tests in order to pass the pipeline.
CI/CD Pipeline with MuleSoft & GitHub Actions· Part 4 of 6
- 1.Part 1: How to set up a CI/CD pipeline to deploy your MuleSoft apps to CloudHub using GitHub Actions
- 2.Part 2: CI/CD pipeline with MuleSoft and GitHub Actions - secured/encrypted properties
- 3.Part 3: CI/CD pipeline with MuleSoft and GitHub Actions - MUnit testing
- 4.Part 4: CI/CD pipeline with MuleSoft and GitHub Actions - MUnit minimum coverage percentage
- 5.Part 5: CI/CD pipeline with MuleSoft and GitHub Actions - Enabling MFA through a Connected App
- 6.Part 6: CI/CD pipeline with MuleSoft and GitHub Actions - Deploying to CloudHub 2.0

In the previous article, we learned how to set up our Nexus credentials to be able to run the MUnits from the CI/CD pipeline. If you haven’t been following the series or you’re not familiar with GitHub Actions, we recommend you start from the first article to understand how we are setting up all the configurations we need.
In this post, we’ll see the steps to add the minimum coverage percentage for the MUnit tests in order to pass the pipeline.
Prerequisites
You should already have all the setup in your Mule application for running the MUnits in a CI/CD pipeline. In summary, this is what you should already have:
- The required dependencies, plugins, or properties in your
pom.xmlto be able to run MUnits for your Mule project. - The working MUnit tests under
src/test/munit. - A working CI/CD pipeline. See the previous article if you still need to set this up.
Modify your pom.xml
This time there’s nothing to add/modify in the other files (build.yml / settings.xml). We’ll simply add the following configuration to our pom.xml under the existing munit-maven-plugin configuration.
<plugin>
  <groupId>com.mulesoft.munit.tools</groupId>
  <artifactId>munit-maven-plugin</artifactId>
  <version>${munit.version}</version>
  <executions>
    <execution>
      <id>test</id>
      <phase>test</phase>
      <goals>
        <goal>test</goal>
        <goal>coverage-report</goal>
      </goals>
    </execution>
  </executions>
  <configuration>
    <!-- START: MUnit coverage -->
    <environmentVariables>
      <secure.key>${decryption.key}</secure.key>
    </environmentVariables>
    <!-- END: MUnit coverage -->
    <coverage>
      <runCoverage>true</runCoverage>
      <!-- START: MUnit coverage -->
      <failBuild>true</failBuild>
      <requiredApplicationCoverage>90</requiredApplicationCoverage>
      <!-- <requiredResourceCoverage>50</requiredResourceCoverage> -->
      <!-- <requiredFlowCoverage>50</requiredFlowCoverage> -->
      <!-- END: MUnit coverage -->
      <formats>
        <!-- START: MUnit coverage -->
        <format>console</format>
        <format>sonar</format>
        <format>json</format>
        <!-- END: MUnit coverage -->
        <format>html</format>
      </formats>
    </coverage>
  </configuration>
</plugin>
Let’s explore each of the changes one by one. Starting with the environmentVariables.
<environmentVariables>
   <secure.key>${decryption.key}</secure.key>
</environmentVariables>
We are adding this variable right here because it needs to be passed down to the Mule application to be able to decrypt the existing secured properties.
Note
If you’re not sure how to do this setup or want to understand where we are using the secure.key or decryption.key, please refer to Part 2 of this series.
Next, we added the configuration to set the minimum coverage percentage for the application to pass the build.
<failBuild>true</failBuild>
<requiredApplicationCoverage>90</requiredApplicationCoverage>
<!-- <requiredResourceCoverage>50</requiredResourceCoverage> -->
<!-- <requiredFlowCoverage>50</requiredFlowCoverage> -->
In this case, we only set up the requiredApplicationCoverage option with a minimum percentage of 90. If you instead (or additional to) want to set up the percentage for the resources or the flows, you can use the other two options. To see the difference in these settings, you can refer to this live stream or the official documentation.
Finally, you can generate different coverage reports to be able to see your statistics in several formats.
<formats>
	<format>console</format>
	<format>sonar</format>
	<format>json</format>
	<format>html</format>
</formats>
You can choose to generate some of them or all of them. Simply add/remove the format field from this configuration.
Docs
For more information, see Coverage Report Types.
Note
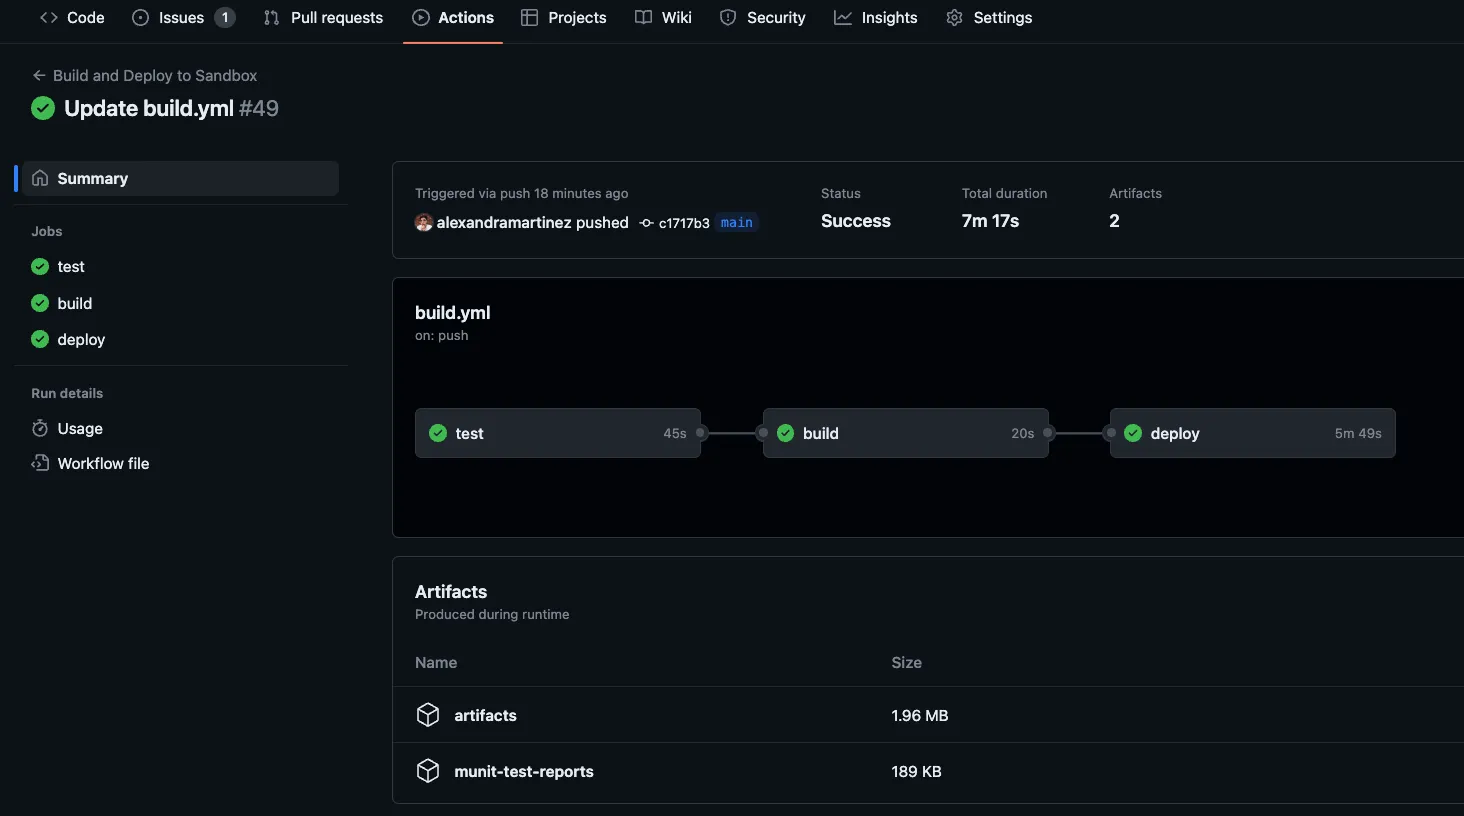
If you want to be able to see your generated reports from the CI/CD pipeline, you can add the following configuration under the test job in your build.yml file. Add this as the last step. You will be able to download the reports after the whole pipeline has finished running (see the next screenshot).
- name: Upload MUnit reports
  uses: actions/upload-artifact@v3
  with:
    name: munit-test-reports
    path: target/site/munit/coverage/
Run the pipeline
That’s it! Once you’re done with the changes, simply push a new change to the main branch and this will trigger the pipeline.
More resources
You can check out my GitHub profile for more CI/CD repos:
- github-actions to deploy a Mule app to CloudHub
- dataweave-utilities-library to publish a DataWeave library to Exchange
- api-catalog-cli-example to update APIs in Exchange using the API Catalog CLI
I hope this was helpful!
Don’t forget to subscribe so you don’t miss any future content.
FAQs
Frequently asked questions about this post.
-
How do I set a minimum MUnit coverage percentage that fails the pipeline?
Add a
coverageblock to the existingmunit-maven-pluginconfiguration in yourpom.xmlwithfailBuildset totrueandrequiredApplicationCoverageset to your minimum percentage; in this post it is set to 90, so the build fails if application coverage drops below that. -
What's the difference between requiredApplicationCoverage, requiredResourceCoverage, and requiredFlowCoverage?
requiredApplicationCoveragesets the minimum percentage for the whole application, whilerequiredResourceCoverageandrequiredFlowCoverageset the minimums for resources and flows respectively; this post only usesrequiredApplicationCoverageat 90 and leaves the other two commented out, and points to a live stream at https://youtu.be/Z0ORL0yoKCo and the official docs at https://docs.mulesoft.com/munit/latest/coverage-maven-concept#set-up-a-minimum-coverage-level for the differences. -
Why do I need to add the secure.key environment variable to the plugin configuration?
The
environmentVariablesblock addssecure.keymapped to${decryption.key}because it needs to be passed down to the Mule application so it can decrypt the existing secured properties when the MUnits run; Part 2 of the series at https://www.prostdev.com/post/part-2-ci-cd-pipeline-with-mulesoft-and-github-actions-secured-encrypted-properties covers where those keys come from. -
Which coverage report formats can I generate, and how do I choose them?
Under the
formatssection you can generateconsole,sonar,json, andhtmlreports, and you choose which ones by simply adding or removing theformatfield from the configuration, generating some or all of them. -
Do I need to change build.yml or settings.xml to add the minimum coverage percentage?
No, this step requires nothing to be added or modified in
build.ymlorsettings.xml; you only add the coverage configuration to thepom.xml, though you can optionally add an upload-artifact step tobuild.ymlif you want to download the generated reports after the pipeline finishes.
More from this series
CI/CD Pipeline with MuleSoft & GitHub Actions· Part 4 of 6
- 1.Part 1: How to set up a CI/CD pipeline to deploy your MuleSoft apps to CloudHub using GitHub Actions
- 2.Part 2: CI/CD pipeline with MuleSoft and GitHub Actions - secured/encrypted properties
- 3.Part 3: CI/CD pipeline with MuleSoft and GitHub Actions - MUnit testing
- 4.Part 4: CI/CD pipeline with MuleSoft and GitHub Actions - MUnit minimum coverage percentage
- 5.Part 5: CI/CD pipeline with MuleSoft and GitHub Actions - Enabling MFA through a Connected App
- 6.Part 6: CI/CD pipeline with MuleSoft and GitHub Actions - Deploying to CloudHub 2.0