Part 6: CI/CD pipeline with MuleSoft and GitHub Actions - Deploying to CloudHub 2.0
Learn the basics of setting up our GitHub Actions pipeline to deploy a Mule application to CloudHub 2.0. Once more, using a Connected App.
CI/CD Pipeline with MuleSoft & GitHub Actions· Part 6 of 6
- 1.Part 1: How to set up a CI/CD pipeline to deploy your MuleSoft apps to CloudHub using GitHub Actions
- 2.Part 2: CI/CD pipeline with MuleSoft and GitHub Actions - secured/encrypted properties
- 3.Part 3: CI/CD pipeline with MuleSoft and GitHub Actions - MUnit testing
- 4.Part 4: CI/CD pipeline with MuleSoft and GitHub Actions - MUnit minimum coverage percentage
- 5.Part 5: CI/CD pipeline with MuleSoft and GitHub Actions - Enabling MFA through a Connected App
- 6.Part 6: CI/CD pipeline with MuleSoft and GitHub Actions - Deploying to CloudHub 2.0

We already learned how to set up secured properties, MUnit coverage, and even a connected app to authenticate when you’re using Multi-Factor Authentication (MFA) in your Anypoint Platform account. From now on, we will continue authenticating using a connected app for best practices.
What are we missing then? Well, we haven’t learned how to enable the CI/CD pipelines for a CloudHub 2.0 deployment. You’d think it’s very similar to CloudHub 1.0, but turns out it’s very different! Don’t worry, I got you :)
If you haven’t been following the series or you’re not familiar with GitHub Actions, we recommend you start from the first article to understand how we are setting up all the configurations we need.
In this post, we’ll learn the basics of setting up our GitHub Actions pipeline to deploy a Mule application to CloudHub 2.0. Once more, using a Connected App.
Prerequisites
- Anypoint Platform - You should have an Anypoint Platform account. You can create a new free trial account here.
- GitHub Repo - You should already have a GitHub repo with a base Mule application and know how to configure secrets in your GitHub repo. If this is not the case, please return to the first article of this series.
Create a connected app in Anypoint Platform
We learned how to create a connected app in the previous article, but let’s go ahead and create a new one. Sign in to Anypoint Platform and navigate to Access Management > Connected Apps.

Click on Create app. Add any name you want to identify this app, like github-actions. Select App acts on its own behalf and click on Add Scopes.
Docs
You can refer to this article to learn more about the minimum scopes for CloudHub 2.0.
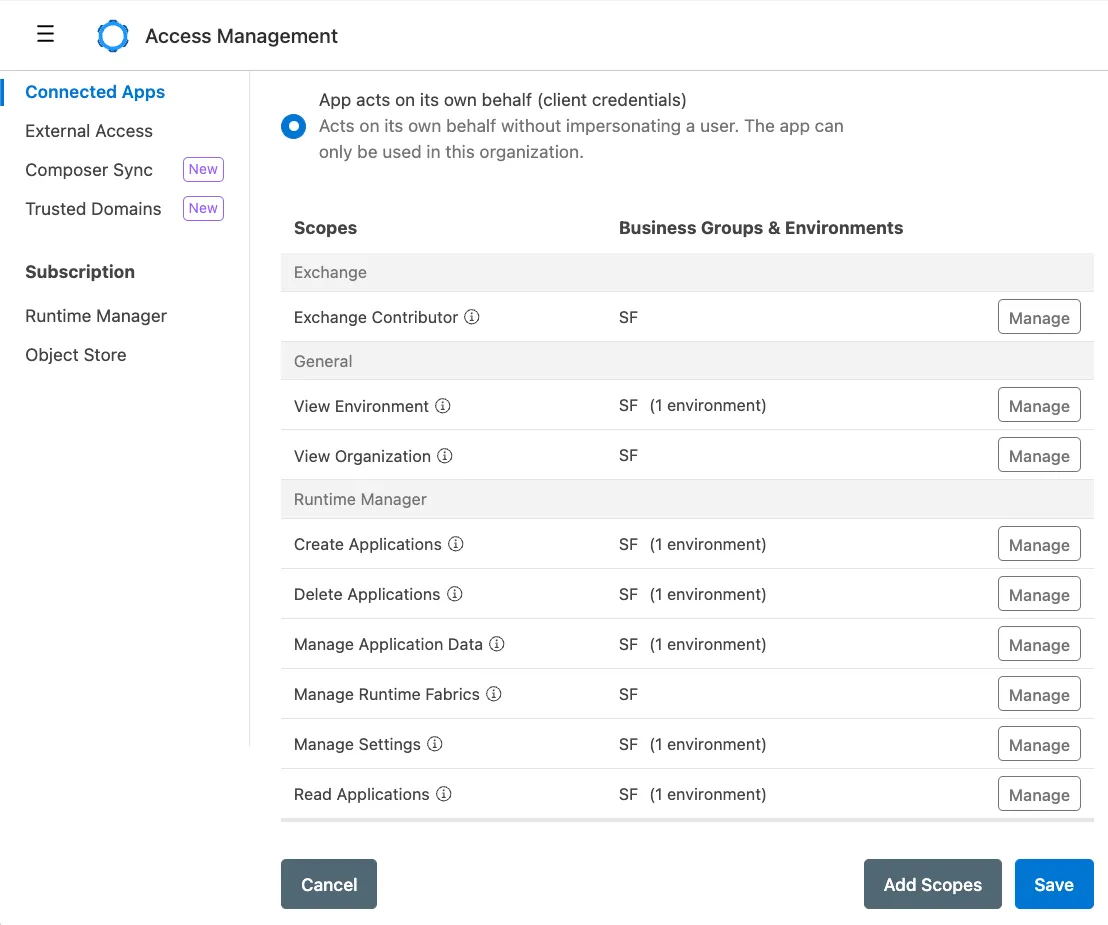
Select the following scopes:
- Exchange Contributor
- View Environment
- View Organization
- Create Applications
- Delete Applications
- Manage Application Data
- Manage Runtime Fabrics
- Manage Settings
- Read Applications
Click on Next. Select your Business Group and the Sandbox environment. Review the scopes and click on Add Scopes. You should end up with something like the following.
After that, click on Save. Make sure you copy both ID and Secret from the generated connected app.
Set up your credentials on GitHub
Just as we’ve done before, go to your GitHub repository and click on the Settings tab. Select Secrets and variables > Actions and add these two new secrets.
CONNECTED_APP_CLIENT_IDCONNECTED_APP_CLIENT_SECRET
The values should match what you previously extracted from Anypoint Platform.
Modify your pom.xml
We’ll start from the beginning on this so we don’t get confused. Starting from a brand new project with no MUnits and no secured properties, open your pom.xml file from the root folder.
The first thing we’ll modify is the groupId. The value here has to match your Business Group ID in Anypoint Platform. Please refer to this post to learn how to extract this value.
You should end up with something like the following:
<groupId>4500658a-7637-4fcf-bc7d-51d1feb28edb</groupId>Next, change your version so it doesn’t say SNAPSHOT. If this is the first version of your app, you can leave it as 1.0.0, like so:
<version>1.0.0</version>Then, in the <properties> tag, change the Mule Maven Plugin version to at least 4.1.0 (we’ll be using 4.1.1).
<mule.maven.plugin.version>4.1.1</mule.maven.plugin.version>And here comes the fun part. Inside the mule-maven-plugin, replace the configuration with the following:
<plugin>
    <groupId>org.mule.tools.maven</groupId>
    <artifactId>mule-maven-plugin</artifactId>
    <version>${mule.maven.plugin.version}</version>
    <extensions>true</extensions>
    <configuration>
        <classifier>mule-application</classifier>
        <cloudhub2Deployment>
            <uri>https://anypoint.mulesoft.com</uri>
            <provider>MC</provider>
            <environment>Sandbox</environment>
            <target>Cloudhub-US-East-2</target>
            <server>Repository</server>
            <applicationName>${project.artifactId}</applicationName>
            <releaseChannel>NONE</releaseChannel>
            <replicas>1</replicas>
            <vCores>0.1</vCores>
            <deploymentSettings>
                <generateDefaultPublicUrl>true</generateDefaultPublicUrl>
            </deploymentSettings>
        </cloudhub2Deployment>
    </configuration>
</plugin>
A few notes regarding this configuration:
<provider>must always be set to MC when deploying to CloudHub 2.0.<environment>in this case is Sandbox, but you can change it if you have a different environment set up.- There is only one
<target>available for your trial account. Before setting this up, you can go to Runtime Manager > Deploy Application and see which region is available for your shared space. In our case, it’s US East (Ohio). Refer to this table to retrieve the target name you need to set up here. - Whatever you write on
<server>needs to match in three other places. We’ll see exactly where in the rest of the article. In our case, we’re setting it up as Repository. - You can use the
<releaseChannel>field to choose between NONE, LTS, or EDGE.- NONE will set up Mule Runtime 4.4.0.
- LTS will set up the latest available LTS version (changes each year). The last LTS version when this post was written was 4.6.x. This is the most stable option if you want to use 4.6.
- EDGE will set up the latest available EDGE version (changes every 4 months). This is a good option if you want to always be on the latest possible version, but a few things might break along the way, so choose carefully.
Note
You can set up additional options to customize your deployment even more. For more information about this, see CloudHub 2.0 Deployment Parameters Reference.
Almost done. Now, keep scrolling down the file until you reach the <repositories> tag. Make sure the Anypoint Exchange version is 3 instead of 2. If this is not the case, change it. It should look like the following.
<repository>
    <id>anypoint-exchange-v3</id>
    <name>Anypoint Exchange</name>
    <url>https://maven.anypoint.mulesoft.com/api/v3/maven</url>
    <layout>default</layout>
</repository>
Add the following repository. Note that this <id> must match the same name you set up before as <server>.
<repository>
    <id>Repository</id>
    <name>Private Exchange repository</name>
    <url>https://maven.anypoint.mulesoft.com/api/v3/organizations/${project.groupId}/maven</url>
    <layout>default</layout>
</repository>
Aaaand finally, make sure you add a <distributionManagement> section at the end (before the </project> closing tag) with the following values. Note that this <id> must be the same as the previous repository.
<distributionManagement>
    <repository>
        <id>Repository</id>
        <name>Corporate Repository</name>
        <url>https://maven.anypoint.mulesoft.com/api/v3/organizations/${project.groupId}/maven</url>
        <layout>default</layout>
    </repository>
</distributionManagement>
Here’s the full pom.xml for you to confirm everything’s good.
<?xml version="1.0" encoding="UTF-8" standalone="no"?>
<project xmlns="http://maven.apache.org/POM/4.0.0" xmlns:xsi="http://www.w3.org/2001/XMLSchema-instance" xsi:schemaLocation="http://maven.apache.org/POM/4.0.0 http://maven.apache.org/maven-v4_0_0.xsd">
    <modelVersion>4.0.0</modelVersion>

    <groupId>4500658a-7637-4fcf-bc7d-51d1feb28edb</groupId>
    <artifactId>test</artifactId>
    <version>1.0.0</version>
    <packaging>mule-application</packaging>

    <name>test</name>

    <properties>
        <project.build.sourceEncoding>UTF-8</project.build.sourceEncoding>
        <project.reporting.outputEncoding>UTF-8</project.reporting.outputEncoding>
        <mule.maven.plugin.version>4.1.1</mule.maven.plugin.version>
    </properties>

    <build>
        <plugins>
            <plugin>
                <groupId>org.apache.maven.plugins</groupId>
                <artifactId>maven-clean-plugin</artifactId>
                <version>3.1.0</version>
            </plugin>
            <plugin>
                <groupId>org.mule.tools.maven</groupId>
                <artifactId>mule-maven-plugin</artifactId>
                <version>${mule.maven.plugin.version}</version>
                <extensions>true</extensions>
                <configuration>
                    <classifier>mule-application</classifier>
                    <cloudhub2Deployment>
                        <uri>https://anypoint.mulesoft.com</uri>
                        <provider>MC</provider>
                        <environment>Sandbox</environment>
                        <target>Cloudhub-US-East-2</target>
                        <server>Repository</server>
                        <applicationName>${project.artifactId}</applicationName>
                        <releaseChannel>NONE</releaseChannel>
                        <replicas>1</replicas>
                        <vCores>0.1</vCores>
                        <deploymentSettings>
                            <generateDefaultPublicUrl>true</generateDefaultPublicUrl>
                        </deploymentSettings>
                    </cloudhub2Deployment>
                </configuration>
            </plugin>
        </plugins>
    </build>
    <repositories>
        <repository>
            <id>anypoint-exchange-v3</id>
            <name>Anypoint Exchange</name>
            <url>https://maven.anypoint.mulesoft.com/api/v3/maven</url>
            <layout>default</layout>
        </repository>
        <repository>
            <id>mulesoft-releases</id>
            <name>MuleSoft Releases Repository</name>
            <url>https://repository.mulesoft.org/releases/</url>
            <layout>default</layout>
        </repository>
        <repository>
            <id>Repository</id>
            <name>Private Exchange repository</name>
            <url>https://maven.anypoint.mulesoft.com/api/v3/organizations/${project.groupId}/maven</url>
            <layout>default</layout>
        </repository>
    </repositories>
    <pluginRepositories>
        <pluginRepository>
            <id>mulesoft-releases</id>
            <name>mulesoft release repository</name>
            <layout>default</layout>
            <url>https://repository.mulesoft.org/releases/</url>
            <snapshots>
                <enabled>false</enabled>
            </snapshots>
        </pluginRepository>
    </pluginRepositories>
    <dependencies>
        <dependency>
            <groupId>org.mule.connectors</groupId>
            <artifactId>mule-http-connector</artifactId>
            <version>1.9.0</version>
            <classifier>mule-plugin</classifier>
        </dependency>
    </dependencies>
    <distributionManagement>
        <repository>
            <id>Repository</id>
            <name>Corporate Repository</name>
            <url>https://maven.anypoint.mulesoft.com/api/v3/organizations/${project.groupId}/maven</url>
            <layout>default</layout>
        </repository>
    </distributionManagement>
</project>
Did you notice we don’t have the connected app’s client id/secret set up in the pom.xml? That is because we will now authenticate using a server in the Maven settings.xml file instead of the pom.xml file.
Modify your settings.xml
In the previous articles, we’ve created our own settings.xml file in the project to simplify things. Let’s do the same here. Create a new .maven folder under the root folder. Then, create a settings.xml file inside it. Copy and paste the following into the file.
<?xml version="1.0"?>
<settings>

  <pluginGroups>
    <pluginGroup>org.mule.tools</pluginGroup>
  </pluginGroups>

  <servers>
    <server>
      <id>Repository</id>
      <username>~~~Client~~~</username>
      <password>${client.id}~?~${client.secret}</password>
    </server>
  </servers>

</settings>
We will be passing the client id/secret through the GitHub Actions file so we’re not hardcoding them in the project.
Note
If you want to authenticate using username and password instead of connected app, simply add your credentials in this server. Just make sure your user has the necessary permissions. For more information, see Authentication Methods.
Modify your build.yml
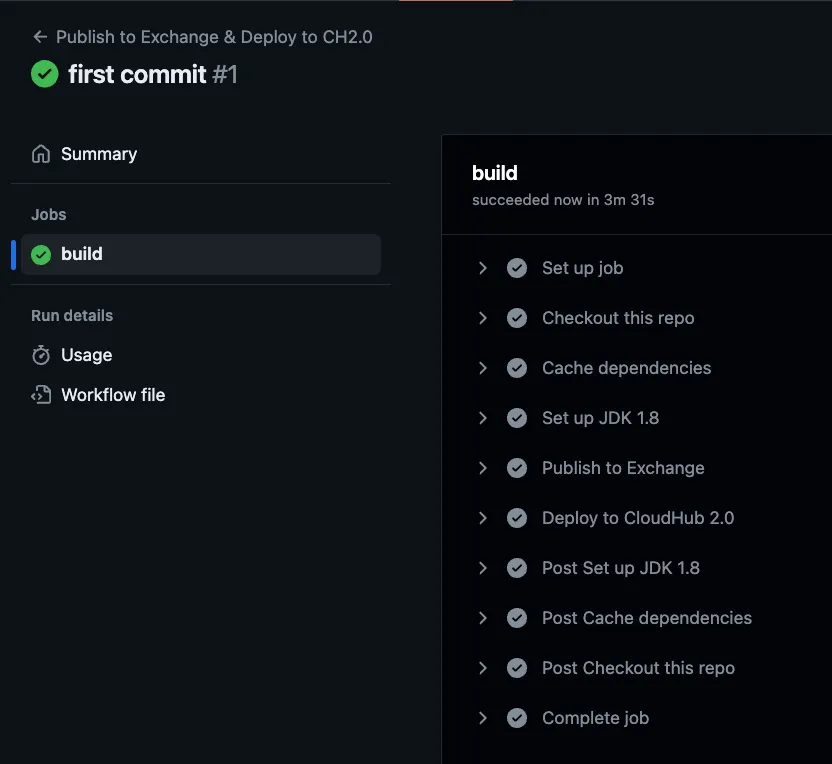
As we’ve done before, create a .github folder in the root folder of the project, then, create a workflows folder, and a build.yml file inside it. Copy and paste the following.
name: Publish to Exchange & Deploy to CH2.0

on:
  push:
    branches: [ main ]

jobs:
  build:
    runs-on: ubuntu-latest
    steps:
      - name: Checkout this repo
        uses: actions/checkout@v4

      - name: Cache dependencies
        uses: actions/cache@v4
        with:
          path: ~/.m2/repository
          key: ${{ runner.os }}-maven-${{ hashFiles('**/pom.xml') }}
          restore-keys: ${{ runner.os }}-maven-

      - name: Set up JDK 1.8
        uses: actions/setup-java@v4
        with:
          distribution: "zulu"
          java-version: 8

      - name: Publish to Exchange
        run: |
          mvn deploy --settings .maven/settings.xml -DskipMunitTests \
          -Dclient.id="${{ secrets.CONNECTED_APP_CLIENT_ID }}" \
          -Dclient.secret="${{ secrets.CONNECTED_APP_CLIENT_SECRET }}"
      - name: Deploy to CloudHub 2.0
        run: |
          mvn deploy --settings .maven/settings.xml -DskipMunitTests -DmuleDeploy \
          -Dclient.id="${{ secrets.CONNECTED_APP_CLIENT_ID }}" \
          -Dclient.secret="${{ secrets.CONNECTED_APP_CLIENT_SECRET }}"
As you can see, we are extracting the secrets you set up at the beginning of the article which contain your connected app’s client id/secret, and passing them to the Mule runtime as the client.id and client.secret properties.
Run the pipeline
That’s it! Once you’re done with the changes, simply push a new change to the main branch and this will trigger the pipeline.
There is something very important that you need to remember tho. Every time you push a new change, you have to change the version in the pom.xml. Otherwise, you will receive an error saying the version has already been published.
This happens because the asset is being published to Exchange and then it’s deployed to CloudHub and each Exchange asset has to have a different version.
Subscribe to receive notifications as soon as new content is published ✨
💬 Prost! 🍻
FAQs
Frequently asked questions about this post.
-
Why do I have to change the version in pom.xml every time I push?
Because each push publishes the asset to Exchange and then deploys it to CloudHub, and each Exchange asset has to have a different version; if you reuse a version you will get an error saying the version has already been published, so you should change the version in your
pom.xmlon every push. -
What value should the `<provider>` field use when deploying to CloudHub 2.0?
The
<provider>must always be set toMCwhen deploying to CloudHub 2.0. -
What's the difference between the NONE, LTS, and EDGE release channels?
In the
<releaseChannel>field,NONEsets up Mule Runtime 4.4.0,LTSsets up the latest available LTS version (which changes each year and was 4.6.x when the post was written, the most stable option for 4.6), andEDGEsets up the latest available EDGE version (which changes every 4 months and keeps you on the latest possible version, though a few things might break along the way). -
Where do I put the connected app's client id and secret instead of the pom.xml?
You don't put them in the
pom.xml; you authenticate using a server in the Mavensettings.xmlfile, referencing them as${client.id}and${client.secret}, and the values are passed in through the GitHub Actionsbuild.ymlfrom theCONNECTED_APP_CLIENT_IDandCONNECTED_APP_CLIENT_SECRETrepository secrets so they are never hardcoded in the project. -
How do I find the correct target name for my trial account?
There is only one
<target>available for a trial account, so before setting it up you can go to Runtime Manager > Deploy Application to see which region is available for your shared space (in the post's case it's US East, Ohio), and you can refer to the CloudHub 2.0 regions and DNS records table at https://docs.mulesoft.com/cloudhub-2/ch2-architecture#regions-and-dns-records to retrieve the target name you need. -
Which scopes does the connected app need for the CloudHub 2.0 deployment?
Select the following nine scopes when creating the connected app: Exchange Contributor, View Environment, View Organization, Create Applications, Delete Applications, Manage Application Data, Manage Runtime Fabrics, Manage Settings, and Read Applications.
More from this series
CI/CD Pipeline with MuleSoft & GitHub Actions· Part 6 of 6
- 1.Part 1: How to set up a CI/CD pipeline to deploy your MuleSoft apps to CloudHub using GitHub Actions
- 2.Part 2: CI/CD pipeline with MuleSoft and GitHub Actions - secured/encrypted properties
- 3.Part 3: CI/CD pipeline with MuleSoft and GitHub Actions - MUnit testing
- 4.Part 4: CI/CD pipeline with MuleSoft and GitHub Actions - MUnit minimum coverage percentage
- 5.Part 5: CI/CD pipeline with MuleSoft and GitHub Actions - Enabling MFA through a Connected App
- 6.Part 6: CI/CD pipeline with MuleSoft and GitHub Actions - Deploying to CloudHub 2.0